The rustic terracotta revival is here — and it’s smarter, bolder, and more accessible than ever before.
If you’ve been scrolling through Pinterest, TikTok, or any design account worth following lately, you’ve already felt it — that warm, clay-kissed pull of terracotta tile trends 2026 is dominating every corner of interior design right now. And we don’t mean the dusty, plain-Jane terracotta of your grandmother’s sunroom. We’re talking glazed terracotta kitchens, hand painted terracotta statement walls, zellige terracotta tiles in bathrooms that belong in a Moroccan riad, and budget terracotta hacks that look like they cost ten times more than they did.
Terracotta is the colour of the earth, of sun-baked clay, of ancient Mediterranean floors and modern minimalist kitchens living their best life simultaneously. It is, without question, the tile material of this decade.
But here’s the thing nobody tells you: terracotta is also wildly versatile, surprisingly affordable, and — if you know the hacks — incredibly easy to work with, even if you’ve never laid a tile in your life.
This post breaks down 10 genuine terracotta tile hacks that are redefining how real people — not just interior designers with unlimited budgets — are using this iconic material to transform their homes in 2026. We’ve woven in the patterns, the colour pairings, the DIY tips, the maintenance secrets, and the niche trends that will keep your space feeling fresh for the next decade.
Let’s get into it.
A Beautiful Home Starts with a Balanced Ledger.”
Before you buy your first crate of terracotta tiles, you need to know exactly where your renovation fund is coming from. Most homeowners lose thousands to “hidden leaks” in their monthly spending that could have funded their dream kitchen.
I’m giving you my Audit Quick-Start Bundle for FREE. Use the Audit Calculator and Blueprint to find the extra cash in your current budget to fund your 2026 home refresh without touching your savings.
[Download the Free Audit Bundle]
Why Terracotta Is Having Its Biggest Moment Yet in 2026
Before we get to the hacks, let’s talk about why terracotta is having such a massive resurgence right now.
For a few years, the design world was obsessed with grey — cold, clean, clinical grey. Subway tiles. Concrete finishes. Polar white everything. And then, almost collectively, the world got tired of feeling like they lived inside a Scandi hospital waiting room.
Enter: warm terracotta palettes.
The shift toward earthy terracotta decor is deeply connected to broader cultural currents — a desire for tactile materials, natural warmth, psychological comfort, and spaces that actually feel lived in. Post-pandemic, people began investing in their homes as emotional sanctuaries, not just Instagram sets. And terracotta — with its imperfections, its handmade quality, its connection to the earth — delivers on that emotional brief better than almost any other material.
In 2026, terracotta tile is being embraced across every room, every budget level, and every design aesthetic. From sleek modern terracotta flooring in architect-designed Scandi kitchens to rustic terracotta revival in farmhouse bathrooms, the range of expression is extraordinary.
The other big driver? Sustainability. Terracotta is a naturally fired clay product with minimal processing. In a world increasingly conscious of material sourcing and environmental impact, tiles made from actual earth carry genuine ethical appeal alongside their aesthetic beauty.
Now. Let’s get to the hacks.
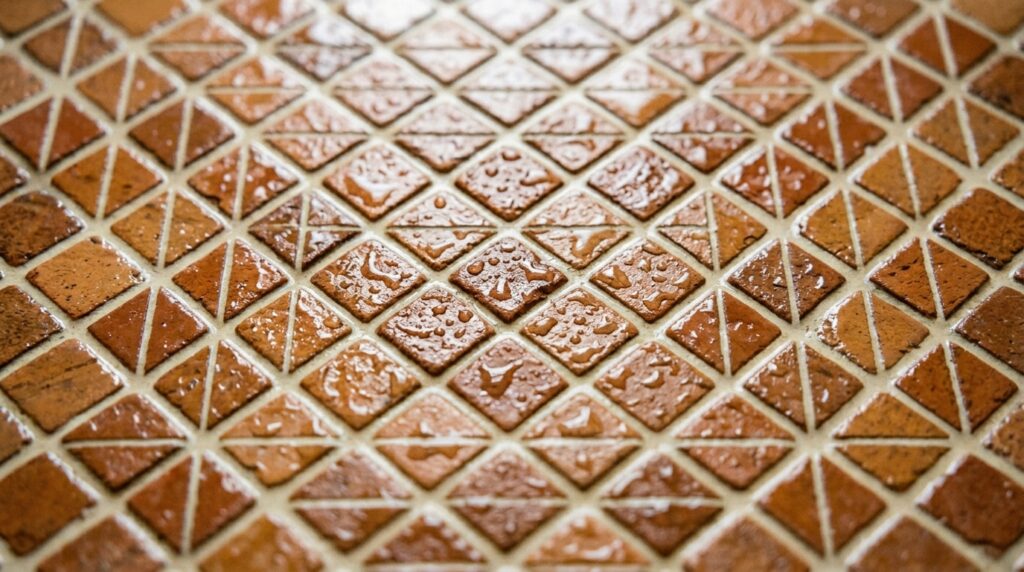
HACK #1: Use Hexagon Terracotta Patterns to Create a Feature Floor That Stops Traffic

If you want a floor that people walk into a room and immediately notice, hexagon terracotta patterns are your answer in 2026.
Hexagons have been a design darling for years, but the particular combination of the hexagon format with the warmth and texture of terracotta creates something genuinely magical. The geometric precision of the six-sided tile plays beautifully against the organic, slightly uneven quality of terracotta clay — and the visual result is a floor that feels both ancient and utterly contemporary.
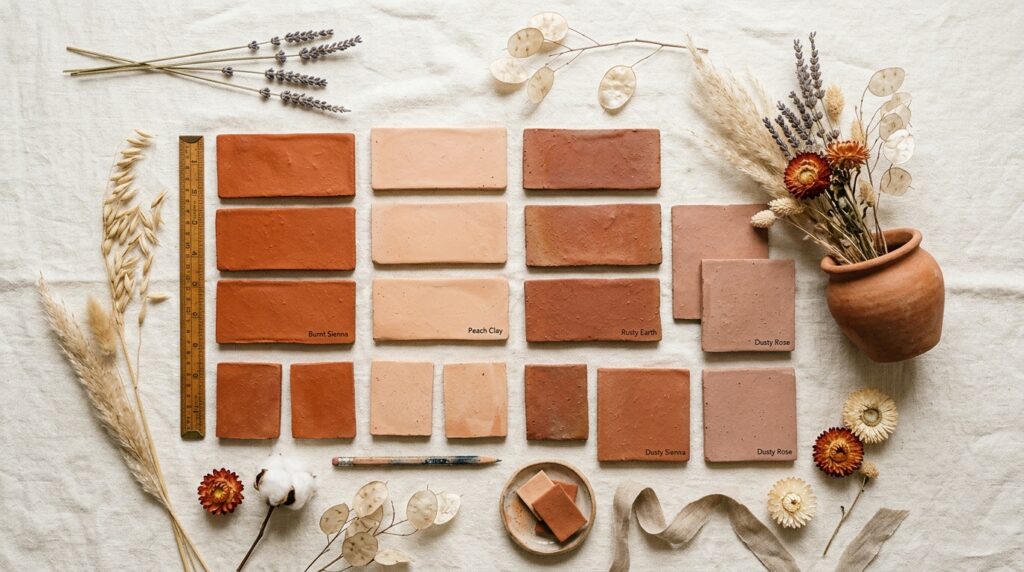
The hack: Mix two shades of terracotta hexagons — a standard burnt clay tone and a slightly lighter, more peachy-nude version — to create a subtle tonal variation across your floor. No grout colour tricks needed. The variation between tiles does the work. This approach is especially powerful in entryways, where hexagon terracotta patterns create an immediate design statement the moment anyone enters your home.
Where it works best:
- Terracotta entryway tiles — hex patterns make a hallway feel like an architectural moment
- Bathroom floors — especially when paired with white or cream walls
- Kitchen islands as a feature zone distinct from the rest of the floor
Pro tip for the terracotta entryway tiles look: Keep the grout joints tight (2mm) and use a warm buff or sand-coloured grout to let the hexagons flow. A white grout will create too much contrast and fragment the pattern visually.
Scale matters: In smaller spaces like bathrooms, opt for 10cm hexagons. In larger rooms and entryways, 20cm hexagons have more visual presence and require fewer cuts, making a DIY terracotta tile install significantly easier.
HACK #2: The Zellige Terracotta Tile Backsplash That Makes Every Kitchen Look Custom-Built
This is the one that design insiders have been quietly obsessing over for the past eighteen months: zellige terracotta tiles used as kitchen backsplashes.
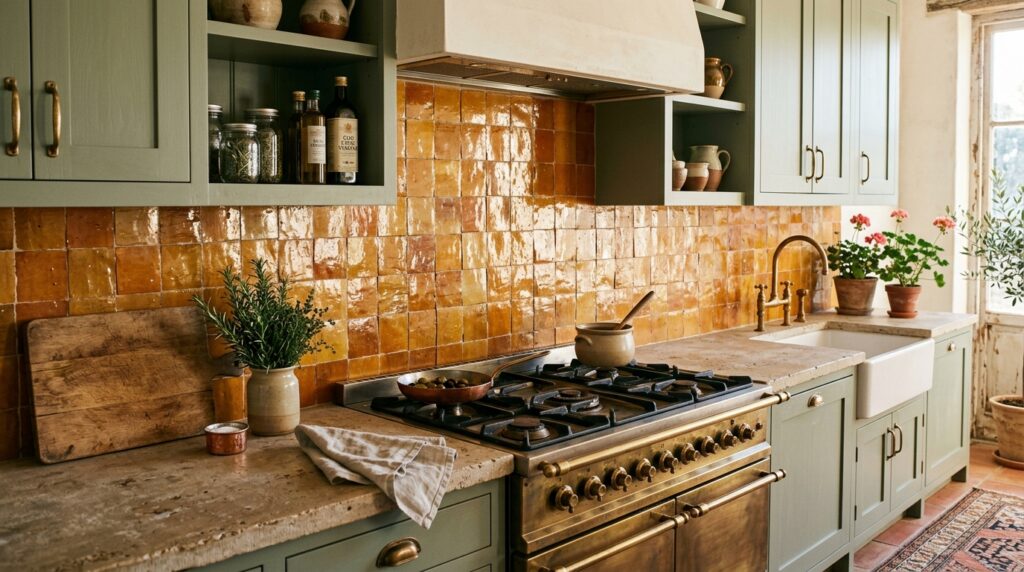
Zellige is a form of Moroccan mosaic tilework characterised by its hand-cut, irregularly shaped tiles with a glossy, slightly uneven glaze. When that aesthetic is applied to terracotta clay bodies in terracotta-family hues — burnt orange, amber, dusty rose, warm ochre — the result is a backsplash so rich and layered it looks like it was custom-imported from a souk.
The hack: You don’t need to tile your entire kitchen in zellige to get the effect. Use zellige terracotta tiles on a single, focused panel — the wall directly behind your cooker or hob. This creates what designers call a “jewel panel” — a contained section of extraordinary detail surrounded by simpler surfaces, so the eye has somewhere to rest and somewhere to celebrate.
The glazed terracotta kitchen backsplash in this style catches light differently throughout the day, shifting from a deep terracotta at dawn to a glowing amber at midday. It is, genuinely, like having a living painting in your kitchen.
Colour combinations to try around your zellige terracotta tiles:
- Warm cream cabinetry + zellige backsplash + brass hardware — the ultimate 2026 Mediterranean terracotta look
- Dark forest green cabinets + zellige terracotta backsplash + aged bronze fittings — dramatic and magazine-ready
- Crisp white everything + zellige terracotta — lets the tile be pure sculpture
Budget note: Authentic zellige is expensive. But many manufacturers now produce machine-made tiles that replicate the zellige aesthetic beautifully at a fraction of the cost. For a DIY terracotta tile install, these are perfectly appropriate — the visual effect is excellent and the consistency of the tiles makes laying them far easier than hand-cut originals.
HACK #3: Lay a Herringbone Terracotta Floor and Never Look Back
If hexagons are the statement maker, herringbone terracotta floor is the classic that refuses to go out of style — and in 2026, it’s being used in ways that feel anything but conventional.
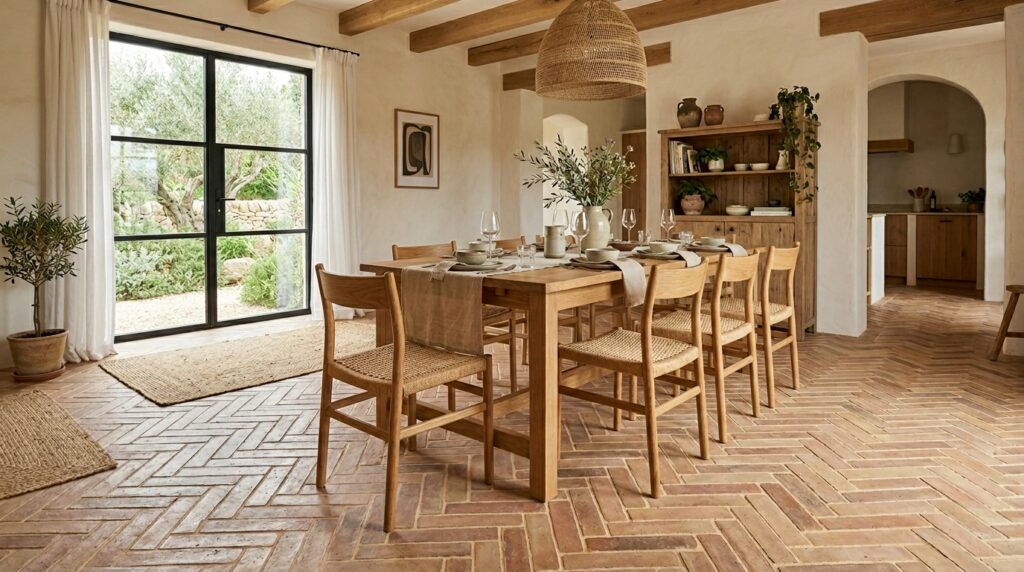
The herringbone pattern — alternating rectangular tiles laid at 45-degree angles to each other — works so perfectly with terracotta because the natural variation in terracotta tone (even within a single tile batch) means every herringbone floor has an organic, almost woven quality. No two herringbone terracotta floors look exactly the same, which is the whole point.
The hack: Use a slightly elongated terracotta plank format (200mm × 100mm or similar) in a herringbone pattern rather than the standard square terracotta tile. The elongated plank herringbone creates a more dynamic, directional energy in a room — it draws the eye, elongates the space, and adds a craftsperson quality that feels genuinely elevated.
Room applications:
- Kitchen floors — herringbone terracotta creates warmth that balances the hardness of kitchen appliances
- Hallways — the directional quality of herringbone naturally guides movement through a space
- Living rooms — laid under a large rug, herringbone terracotta acts as an extraordinarily rich border
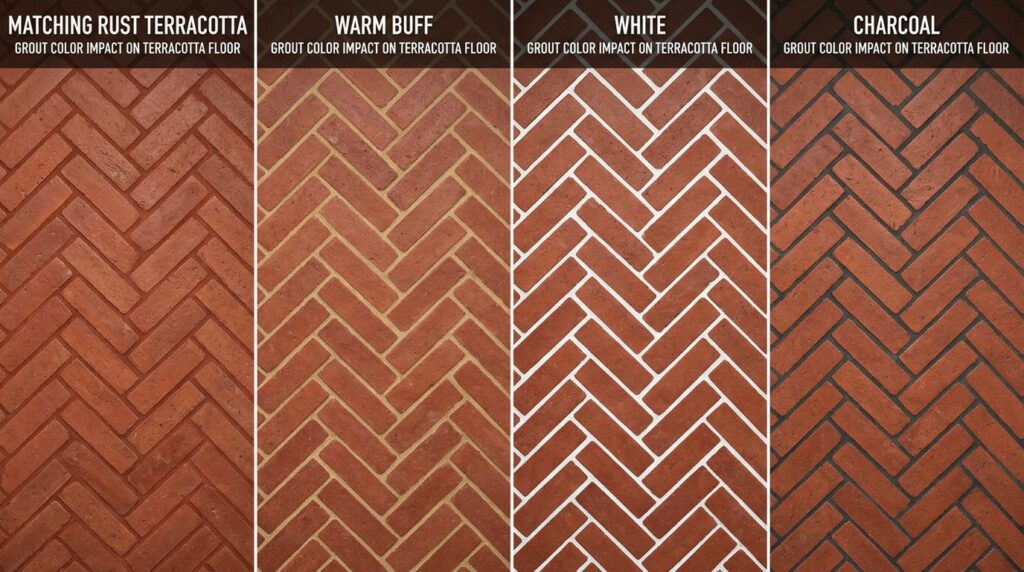
The terracotta grout colour decision: This is where most people go wrong on a herringbone terracotta floor. The grout is not an afterthought — it is part of the pattern. For herringbone, you have two excellent options:
- Matching terracotta grout (a warm rust or brick-toned grout) — this creates a monolithic, unified floor where the pattern reads subtly and the overall effect is rich and enveloping.
- Warm white or cream grout — this throws the herringbone pattern into sharper relief, making it more graphic and defined. Better for smaller spaces where you want the pattern to feel intentional rather than all-consuming.
Avoid grey grout on terracotta. It will cool the floor visually and work against every warm quality that makes terracotta worth choosing.
HACK #4: The Vertical Terracotta Accent Wall That Changes the Scale of a Room
Here’s a hack that fewer people are talking about but absolutely everyone is noticing in finished rooms: vertical terracotta accent walls.
The traditional thinking about tile was always horizontal — tiles go on floors, or on walls in a brick-bond or grid pattern running left to right. But 2026’s biggest shift in terracotta tile bathrooms and living spaces is the vertical application of elongated tiles, creating a visual effect that dramatically increases perceived ceiling height.
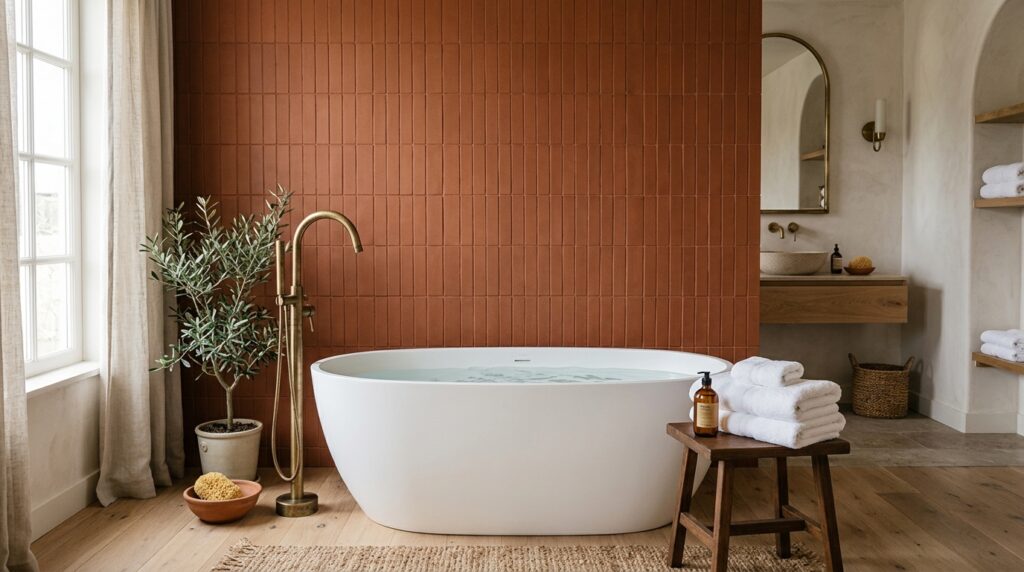
The hack: Take a standard terracotta rectangular tile (let’s say 75mm × 300mm) and lay it vertically, in a stacked bond pattern (tiles directly above each other, no offset), on a single accent wall. The result is a wall that reads almost like reeded or fluted panelling — deeply architectural, textured, and extraordinarily contemporary.
This vertical terracotta accent approach works especially well in rooms with lower ceilings, where drawing the eye upward compensates for the lack of height. It’s also transformative in terracotta tile bathrooms, where a full vertical tile treatment on one wall behind the shower or bath creates a spa-like enclosure.
The installation reality: Running tiles vertically means your cuts are on the horizontal (top and bottom) rather than the sides, which actually simplifies installation along the longest walls. The critical thing is perfect vertical alignment — use a laser level before you lay a single tile.
Colour pairing for vertical terracotta accent walls:
- White or off-white on the adjacent walls to let the terracotta breathe
- Deep navy or forest green cabinetry if it’s a kitchen or bathroom
- Natural linen textiles nearby to extend the earthy palette
Grout: For the stacked vertical look, keep grout joints minimal (1–2mm) and use a matching terracotta grout colour. This maximises the architectural, reeded-panel effect and minimises the gridded look.
HACK #5: Create a Mosaic Terracotta Design Feature Without Hiring a Professional
Mosaic terracotta designs are among the most visually arresting applications of this material — and they’re also, surprisingly, among the most accessible for a confident DIYer.
The key shift in thinking is this: you don’t need to create an elaborate bespoke mosaic to get the mosaic effect. Pre-mounted mosaic terracotta sheets — typically 30cm × 30cm mesh-backed panels of small terracotta tesserae — allow you to create complex-looking patterns with straightforward installation.
The hack: Use mosaic terracotta sheets to create a bordered panel within a simpler tile surround. For example, in a terracotta tile bathroom: lay large-format plain terracotta tiles on the majority of the floor, but insert a central mosaic terracotta panel as a “rug” motif in the middle. The effect is extraordinary — it looks painstakingly custom, but the mosaic panel itself is a single piece of mesh-backed tile.
This bordered mosaic approach works in multiple locations:
- Shower floors — mosaic terracotta is ideal here because the small tiles conform to the slight fall (slope) required for drainage, something large-format tiles cannot do
- Terracotta kitchen backsplash — a mosaic panel between floating shelves reads as artwork
- Fireplace surrounds — the irregular mosaic surface catches firelight in a way that larger tiles simply cannot replicate
Pattern within the mosaic: Many mosaic terracotta designs come pre-arranged in geometric patterns — diamonds, squares, Moroccan stars, even simple running bonds. For maximum impact, choose a pattern that contrasts with the grid of your surrounding tiles. If your field tile is square, choose a diamond-oriented mosaic. If your field tile runs in a brick bond, choose a geometric mosaic with clear axes.
For the DIY terracotta tile install: Apply mosaic panels using standard white adhesive (not terracotta-coloured adhesive, which can bleed through the mesh). Allow full adhesive cure before grouting. Use a soft rubber grout float to work grout into the tight joints without dislodging the individual tesserae.
HACK #6: Hand Painted Terracotta for One-of-a-Kind Custom Looks
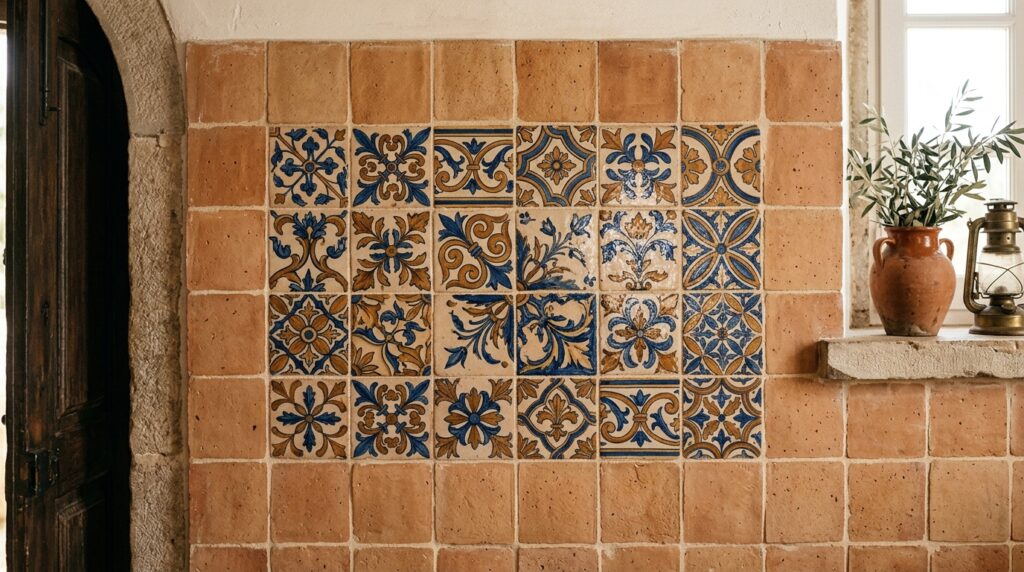
This is the hack that interior designers would rather you didn’t know about, because it completely democratises a look that used to be exclusively the domain of expensive custom tile orders.
Hand painted terracotta tiles — plain terracotta bisque tiles with painted surface patterns — are available from specialist tile manufacturers and increasingly from artisan sellers on platforms like Etsy. They’re also something you can genuinely do yourself with the right materials.
The hack — buying hand painted terracotta: For a terracotta kitchen backsplash or terracotta wall tiles in a bathroom, use hand painted terracotta tiles as individual accents within a field of plain terracotta. A typical approach is 80% plain terracotta tile, 20% hand painted tiles with botanical, geometric, or figurative patterns, distributed at irregular intervals. The painted tiles function as a kind of scattered artwork embedded in the wall — visually surprising and completely unique.
The hack — painting your own: If you want complete creative control, you can purchase unglazed terracotta bisque tiles and apply specialist ceramic underglazes or cold-finish tile paints. This is genuinely achievable for anyone with reasonable craft skills. A simple hand-painted geometric or floral motif on even a handful of tiles, interspersed among plain ones, creates a look of significant intentionality and artistic flair.
Key considerations for hand painted terracotta:
- Ensure any painted tiles used in wet areas (showers, splashbacks) are sealed with an appropriate penetrating sealer and a compatible topcoat
- The irregularity of hand painted designs is a feature, not a flaw — lean into imperfection
- Portuguese, Spanish, and Moroccan tile painters produce extraordinary hand painted terracotta that is still relatively affordable when ordered direct
The Mediterranean terracotta look connection: Hand painted terracotta tiles are intrinsically connected to the Mediterranean terracotta look — the geometric patterns of Andalucía, the azulejo traditions of Portugal, the zellige artisanship of Morocco. Using even a few hand painted tiles grounds your design in something genuinely culturally rich.
HACK #7: Master the Terracotta Grout Colour Game
This is the hack that experienced tilers and designers will tell you is the single highest-impact decision in any terracotta tile project, yet it’s consistently underestimated by first-time DIYers.
Your terracotta grout colour choice changes everything.
Grout is not a neutral. Grout is an active design decision that will either amplify your terracotta’s warmth or systematically undermine it. In 2026, the most sophisticated terracotta tile projects treat grout as part of the design brief, not an afterthought.
The hack — the four terracotta grout approaches:
1. Matching/Tonal Grout Choose a grout in the same family as your tile — a warm terracotta, rust, or clay-coloured grout. Effect: unified, monolithic, the tile reads as a continuous surface. Best for large-format tiles and herringbone terracotta floors where you want richness over pattern definition.
2. Warm Neutral Grout Choose a warm beige, sand, or buff grout — lighter than the tile but still in the warm family. Effect: the tile grid becomes visible without jarring contrast. Adds definition while maintaining warmth. The most versatile option and the most commonly used in modern terracotta flooring applications.
3. White/Cream Grout High contrast, graphic. Makes the tile pattern pop dramatically. Best for terracotta wall tiles, hexagon terracotta patterns, and mosaic terracotta designs where the pattern is the point.
4. Dark/Charcoal Grout A daring choice that creates extraordinary drama — terracotta tiles with dark grout have a jewel-box quality, as if each tile is set in precious metal. Best used in small doses: a shower niche, a fireplace panel, a terracotta tile bathroom feature wall.
What to avoid: Grey grout on terracotta. It introduces a coolness that fights the tile’s fundamental warmth. Even a “warm grey” will subtly undermine terracotta’s best qualities. If you’re drawn to grey grout, it’s a signal you might actually want a cooler tile material entirely.
Maintenance note on grout: Terracotta tile maintenance for grout joints is straightforward — seal grout lines with a penetrating sealer annually in wet areas, and clean with pH-neutral products. Avoid acidic cleaners (including vinegar), which can etch both the tile and the grout over time.
HACK #8: Peel and Stick Terracotta for Renters and Risk-Averse Decorators
Not everyone owns their home. Not everyone has the confidence (or the time) for a full DIY terracotta tile install. And that’s exactly where peel and stick terracotta tiles have become one of 2026’s most surprisingly useful decor developments.
Before you roll your eyes: modern peel and stick terracotta tiles are not the flimsy, plasticky stick-ons of a decade ago. The quality of materials and printing in this category has improved enormously, and at the premium end of the market, the results are genuinely convincing — particularly for vertical applications like backsplashes and terracotta wall tiles.
The hack: Use premium peel and stick terracotta tiles (look for vinyl-composite options with textured surfaces, not flat printed versions) on the following surfaces where the effect is maximised and the limitations are minimised:
- Kitchen backsplashes — vertical position, no foot traffic, no direct steam if properly sealed. Peel and stick terracotta backsplash ideas work brilliantly here.
- Bathroom walls above the waterline — accent zones, behind mirrors, above dado height
- Feature panels in living spaces — fireplace surrounds, alcoves, shelving backdrops
- Terracotta entryway tiles on a smooth, hard floor surface — some premium peel and stick products are rated for light foot traffic
What peel and stick cannot do: Replace real tile on shower floors or walls within the wet zone, or on kitchen floors where there will be significant foot traffic and spillage. For those applications, real tile is non-negotiable.
The budget terracotta hacks angle: Peel and stick terracotta is genuinely one of the most cost-effective budget terracotta hacks available, typically running at a fraction of the cost per square metre of real tile, with zero adhesive, zero grouting, and zero professional labour costs. For renters who want the terracotta aesthetic without permanence, it’s an absolute game-changer.
Application tip: Surface preparation is everything with peel and stick. The wall must be clean, dry, smooth, and primed if necessary. Any texture, paint bubbles, or grease will cause peeling within weeks. Spend 80% of your time on prep and 20% on laying the tiles.
HACK #9: Take Terracotta Outdoors — The Outdoor Terracotta Patio Transformation
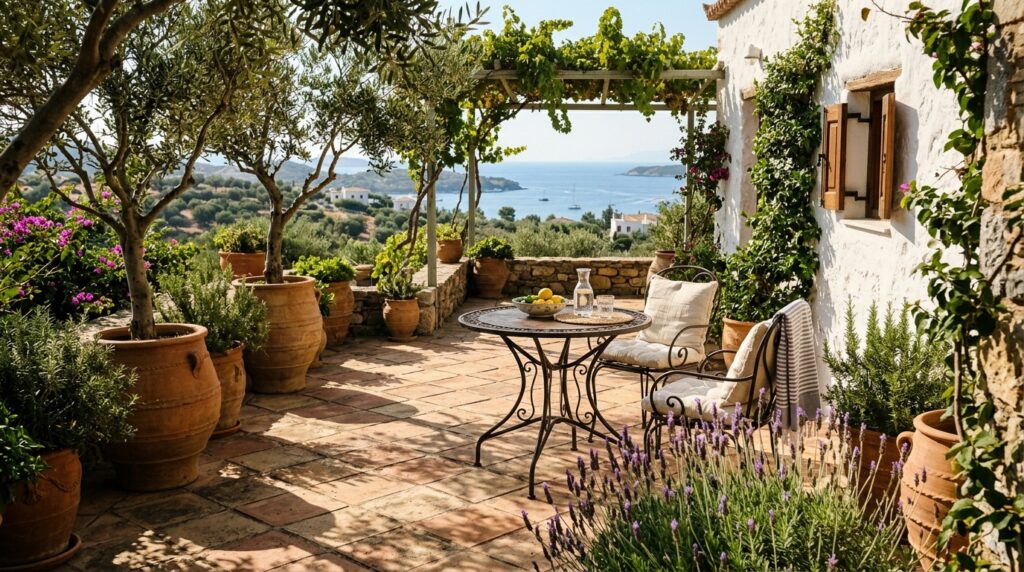
One of the most underused applications of terracotta in 2026 is the outdoor space, and it represents one of the most significant return-on-investment upgrades you can make to your home.
The outdoor terracotta patio is a direct descendant of centuries of Mediterranean garden design — and for good reason. Terracotta’s warm clay tones sit beautifully against greenery, against natural timber, against rendered white walls, and against the particular quality of outdoor light that makes every surface glow more warmly than it does indoors.
The hack — outdoor terracotta specification: Not all terracotta tiles are suitable for outdoor use. You need tiles specifically rated for exterior applications, which means:
- Frost resistance — in climates where temperatures drop below zero, standard terracotta will absorb water and crack when that water freezes. Look for tiles with a water absorption rate below 3% for outdoor use in cold climates.
- Non-slip surface texture — outdoor patio tiles must have adequate slip resistance, particularly around water features, pools, or in rain-prone climates. Look for tiles with an R10 or higher slip resistance rating.
- Sufficient thickness — outdoor terracotta tiles are typically laid on a mortar bed and should be at least 12mm thick.
Patio pattern ideas for outdoor terracotta:
- Diagonal square setting (45-degree grid) — classic Mediterranean terracotta look that maximises the feeling of space
- Mixed size setting (combining 30cm and 15cm squares) — creates a more complex, traditional Andalusian courtyard aesthetic
- Running bond with wide joints — casual, rustic, earthy terracotta decor that suits cottage gardens and relaxed entertaining spaces
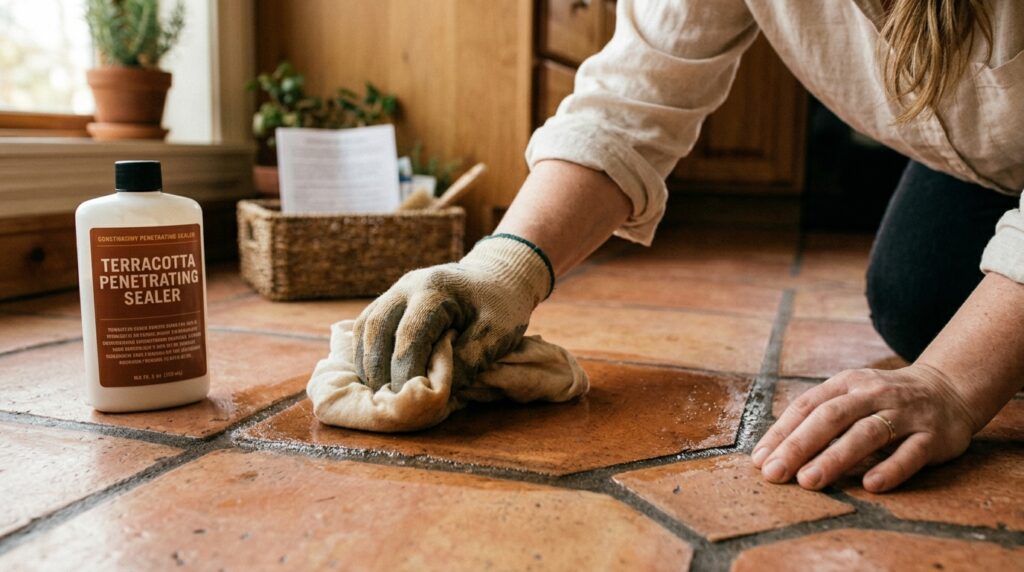
The outdoor terracotta maintenance secret: Seal your outdoor terracotta patio tiles with a quality penetrating impregnator sealer before they go down (all six sides, including the back) and again on the surface once installed. This dramatically reduces staining from food, wine, leaves, and general outdoor living, and makes terracotta tile maintenance genuinely manageable over the long term.
Plant pairing: The earthy terracotta decor of an outdoor patio is amplified enormously by the right planting. Olive trees, agaves, lavender, rosemary, and terracotta pots (naturally) all complement the warm palette. Avoid plants with very dark or cool-toned foliage — they’ll fight the warmth of the tile rather than harmonise with it.
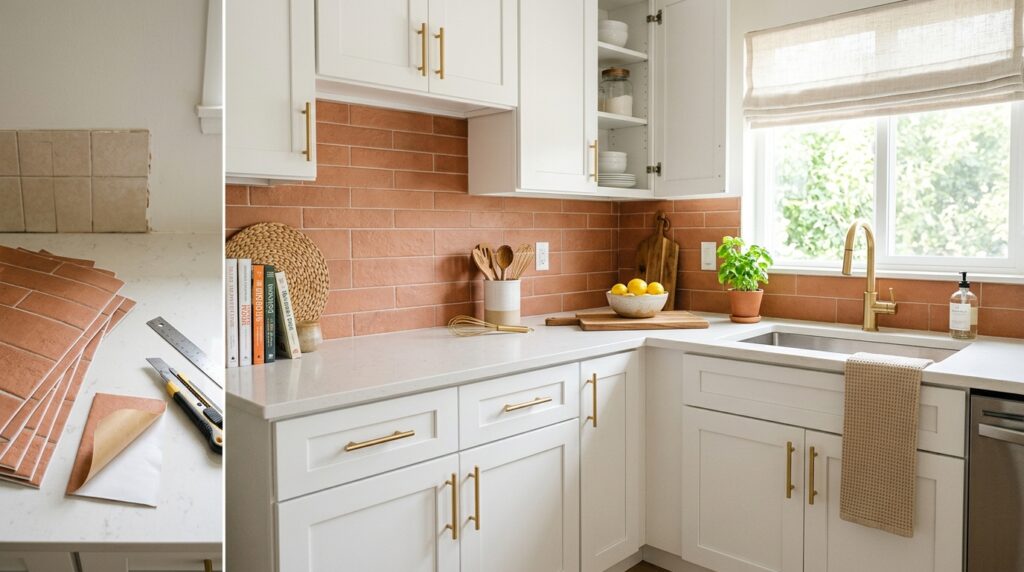
HACK #10: The Glazed Terracotta Kitchen Transformation on a Budget
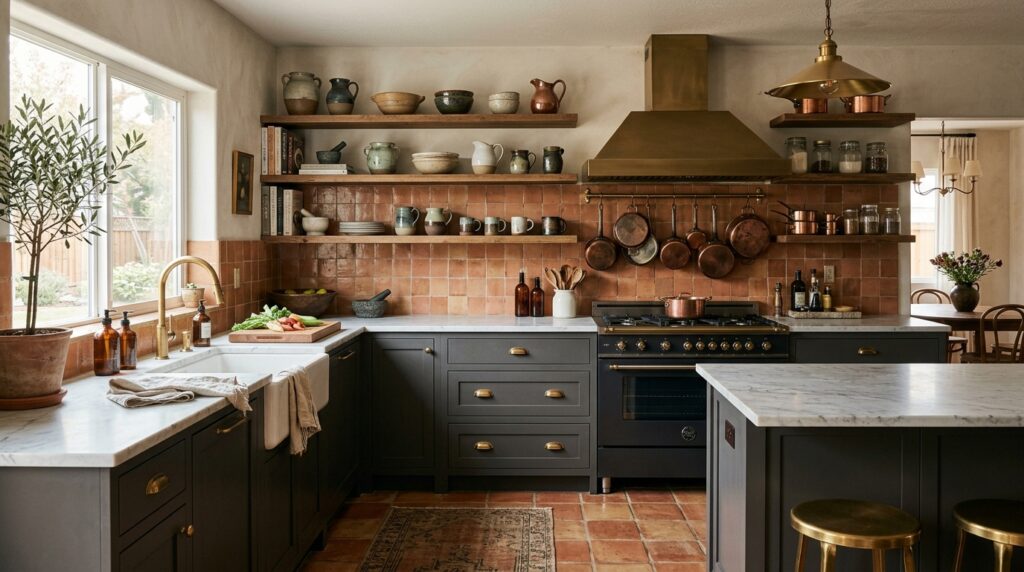
Saving the most versatile hack for last: the glazed terracotta kitchen approach, which gives you all the warmth and character of terracotta with added durability, a wider colour range, and — critically — a surface that’s genuinely practical for kitchen use.
Unglazed terracotta in kitchens requires diligent sealing and maintenance. Glazed terracotta, by contrast, has a sealed surface built into the tile itself, making it resistant to staining, easy to clean, and suitable for splashback and wall applications without additional sealing.
The hack: Use glazed terracotta tiles for your kitchen backsplash and wall applications (where they need to perform hard work), and reserve the unglazed or lightly sealed format for areas with lower intensity demands. This hybrid approach gives you maximum aesthetic flexibility with minimum maintenance burden.
Budget terracotta hacks for the glazed kitchen:
Hack A — The Single Wall Transformation Rather than tiling your entire kitchen, tile only the backsplash behind the hob and sink, and paint the remaining walls in a warm terracotta or burnt orange tone that picks up the tile colour. The painted walls blur the boundary between tile and plaster, making the tiled area feel like a deliberate design choice rather than a budget limitation.
Hack B — The Oversized Format Illusion Use large-format glazed terracotta tiles (60cm × 60cm or larger) on the kitchen floor instead of the standard smaller formats. Larger tiles mean fewer grout lines, which makes the floor read as a single warm expanse rather than a tiled surface. The room feels larger, the installation is faster, and the terracotta colour saturates the space more completely.
Hack C — The Texture Contrast Kitchen Combine matte unglazed terracotta floor tiles with glossy glazed terracotta wall tiles. The contrast between matte and glossy surfaces at different heights creates enormous visual depth and sophistication — it reads as designed, not accidental. The glossy uppers bounce light back into the room; the matte lowers anchor the space and hide foot traffic.
Warm terracotta palettes for the kitchen: The most successful glazed terracotta kitchens in 2026 pair tile with these colours:
- Antique white or warm linen cabinetry — lets the tile be the hero
- Sage green or eucalyptus cabinetry — creates a garden-adjacent freshness
- Warm charcoal or graphite cabinetry — dramatic, confident, magazine-cover worthy
- Natural oak or walnut timber — the wood grain and terracotta clay sing together
Hardware: Aged brass, unlacquered brass, or antique bronze. Always. Silver or chrome hardware fights terracotta’s warmth. Brass echoes the golden undertones in the clay and unifies the whole palette.
The Complete Terracotta Tile Maintenance Guide (Keep Your Investment Looking Perfect)
Every one of the hacks above is worth protecting with proper terracotta tile maintenance. Here’s the complete guide:
Sealing
Unglazed terracotta must be sealed. Full stop. This applies to floors, walls, and outdoor terracotta patios. A penetrating impregnator sealer (silane/siloxane-based) should be applied before grouting, allowed to cure fully, and then re-applied to the finished surface.
Seal outdoor terracotta annually. Seal indoor terracotta every two to three years, or whenever water no longer beads on the surface.
Daily Care
- Sweep or vacuum daily to remove abrasive grit that can scratch the surface
- Mop with warm water and a pH-neutral cleaner
- Wipe up spills immediately, particularly oils, wine, and acidic substances
- Never use vinegar, bleach, or citrus-based cleaners on terracotta — acids etch the surface and degrade the sealer
Stain Removal
For oil-based stains: apply a paste of baking soda and water, cover with clingfilm, and leave for 24 hours. The poultice draws the oil out of the tile.
For organic stains (wine, coffee, food): a dilute hydrogen peroxide solution applied to the stain and left for 20 minutes, then rinsed thoroughly.
Grout Maintenance
Regrout visibly cracked or discoloured grout joints rather than trying to clean them — new grout is faster and more effective than any cleaning product for degraded grout. Re-seal new grout with a penetrating sealer after it cures (typically 28 days).
Pulling It All Together: The 2026 Terracotta Palette Masterclass
The tiles are only half the story. The warm terracotta palettes that make these spaces sing are built from a consistent set of complementary tones and textures. Here’s how to build yours:
Base tier — the tile itself: Choose your dominant terracotta. This is your anchor colour. Everything else is calibrated against it. Note the undertone — is your terracotta more orange (warm), more pink (peachy), more brown (earthy), or more red (fiery)?
Second tier — walls and cabinetry: Stay in the warm hemisphere. Cream, warm white, linen, sage green, dusty pink, warm charcoal, or natural timber tones. The moment you introduce a cool grey or a bright white with blue undertones, the terracotta will look jarring rather than harmonious.
Third tier — soft furnishings and textiles: Linen, cotton, jute, rattan, raw wool. Natural textures support the earthy terracotta decor narrative. Layer tones within the warm family — rust cushions, amber throws, cream curtains, woven baskets.
Fourth tier — plants: Greenery warms any terracotta space. Favour plants with warm-toned or silvery foliage rather than very dark green — dusty miller, olive, eucalyptus, and figs all work beautifully in the Mediterranean terracotta look.
Metal accents: Aged brass, unlacquered brass, antique bronze, hand-hammered copper. Avoid chrome, nickel, and stainless steel — they cool the palette and break the spell.
Latest terracotta tile design trends
Your DIY Terracotta Tile Install Checklist
Whether you’re attempting a full DIY terracotta tile install or just replacing a few tiles, here is your preparation and execution checklist:
Before you start:
- Calculate your tile area and add 15% for cuts and breakage (more for diagonal patterns — add 20%)
- Order a sample batch first and live with it in your space for at least 48 hours under different light conditions
- Check that your substrate is level, solid, and suitable for tile adhesive
- For floors, ensure the subfloor deflection is within tolerance — excessive flex will crack terracotta over time
- Select your terracotta grout colour and order enough grout for the whole project (plus 20% extra)
- Purchase penetrating sealer, adhesive, spacers, and a tile cutter or grinder rated for natural stone/terracotta
During installation:
- Dry-lay your tiles first to visualise the layout and confirm your starting point
- Mix adhesive to a creamy, lump-free consistency
- Back-butter individual tiles AND apply adhesive to the substrate (double-buttering ensures full coverage, which is critical with terracotta’s slight surface variation)
- Check for level after every 3–4 tiles with a long spirit level
- Clean adhesive from tile surfaces before it sets — terracotta is porous and dried adhesive is very difficult to remove
- Allow full adhesive cure before grouting (typically 24 hours minimum, 48 hours for floors)
After grouting:
- Clean excess grout within 20–30 minutes with a damp sponge (diagonal strokes across the joints)
- Polish with a dry cloth once the grout haze has dried
- Allow grout to cure for 28 days before applying grout sealer
- Apply tile sealer and buff to finish
Frequently Asked Questions About Terracotta Tile in 2026
Is terracotta tile still on trend in 2026? Absolutely — and more so than ever. Terracotta tile trends 2026 show no sign of abating. If anything, the trend is broadening from its initial focus on kitchens and bathrooms into living rooms, bedroom floors, outdoor terraces, and feature walls. The material’s versatility and sustainability credentials make it one of the few tile trends with genuine long-term staying power.
Is terracotta tile hard to maintain? Glazed terracotta is as easy to maintain as any standard wall tile. Unglazed terracotta requires sealing but is otherwise low-maintenance if properly looked after. Daily sweeping, weekly mopping with a neutral cleaner, and annual sealing is all that’s needed for most indoor applications. See the full terracotta tile maintenance guide above.
Can I use terracotta tiles in a bathroom? Yes — terracotta tile bathrooms are one of 2026’s most popular applications. The key is to use glazed terracotta in the wet zone (shower walls and floors) and ensure all unglazed terracotta in the bathroom is thoroughly sealed. Use a non-slip rated tile for shower floors.
What colour grout is best for terracotta? It depends on your desired effect. Matching terracotta grout creates a unified, rich look. Warm buff grout adds subtle definition. White grout makes the pattern graphic and bold. Dark grout creates drama. The one colour to avoid is cool grey — it fights terracotta’s warmth. See the full terracotta grout colour guide in Hack #7.
Are peel and stick terracotta tiles any good? Modern premium peel and stick terracotta tiles are genuinely impressive for backsplash and wall applications. They’re not a replacement for real tile on floors or in wet zones, but as a renter-friendly or budget-conscious solution for vertical surfaces, they represent excellent value and are dramatically better than equivalent products from even five years ago.
Can terracotta tiles be used outdoors? Yes — provided you specify tiles rated for outdoor use with adequate frost resistance and slip rating. An outdoor terracotta patio properly installed and sealed is an extraordinarily beautiful and durable surface. See Hack #9 for the full specification guide.
“Ready to bring more warmth into your home? [Browse the Slow Textures Archive] for 2026’s most grounded design trends.”
Final Thoughts: Why Terracotta Is More Than a Trend
Here is the thing that makes terracotta different from every other tile trend of recent memory: it connects to something genuinely enduring in human experience.
We have been firing clay and laying it underfoot for thousands of years. The terracotta floors of ancient Roman villas. The Andalusian patios of Southern Spain. The riad courtyards of Marrakech. The farmhouses of Provence. The coastal homes of the Greek islands. Everywhere human civilisation made itself comfortable in a warm climate, terracotta was there.
When we use terracotta in our 2026 kitchens, bathrooms, and entryways, we’re not just following a trend — we’re tapping into an unbroken visual language that carries warmth, permanence, and humanity in every fired particle of clay.
The rustic terracotta revival is not nostalgia. It’s recognition.
And with the hacks in this guide — from zellige terracotta tiles and hand painted terracotta to peel and stick terracotta backsplash ideas and the perfect herringbone terracotta floor — you now have everything you need to make it yours.
Go lay some tiles.
Did you try any of these terracotta tile hacks? Share your project in the comments — we’d love to see your space. And if you found this post helpful, pin it for later and share it with a friend who’s mid-renovation!
Tags: terracotta tile trends 2026, modern terracotta flooring, terracotta backsplash ideas, DIY terracotta tile install, zellige terracotta tiles, hexagon terracotta patterns, herringbone terracotta floor, glazed terracotta kitchen, terracotta wall tiles, earthy terracotta decor, terracotta tile bathroom, vertical terracotta accent, mosaic terracotta designs, hand painted terracotta, terracotta grout color, rustic terracotta revival, terracotta entryway tiles, Mediterranean terracotta look, peel and stick terracotta, terracotta tile maintenance, warm terracotta palettes, budget terracotta hacks, outdoor terracotta patio
Renovate Like a Strategist, Not Just a Decorator.”
Turning these 10 terracotta hacks into reality requires more than just a mood board—it requires a command centre. I managed my entire 2026 home transformation using the Professional Engine Room. It’s the same system I use as a CPA to keep high-stakes projects on track and audit-proof.
Master your home investment with:
- Ghost Audit Tracker (Spreadsheet): The automated engine that hunts down phantom subscriptions to pay for your tile grout and supplies.
- Daily Revenue & Expense Tracker: Keep your renovation budget from spiraling with high-precision cost logging.
- Notion Command Centre: The central vault for your floor plans, contractor quotes, and 2026 design goals.
- Professional Invoice Generator: The tool I use to bill high-ticket clients to fund my interior design obsession.
- Wealth Shift PDF: Your guide to turning “lifestyle spending” into long-term equity.
[Get the Professional Engine Room – Build Your Dream Space]